Preamble
In the printing industry, many different printing methods and technologies are used, the most popular ones today are: offset printing; flexographic printing; letterpress printing; gravure printing; screen printing; digital printing. In addition, there is a printing method that not everyone knows, including many people who have worked in the printing industry for many years, while its products are present in all areas of human life. That is the Tampon printing method. So what is Tampon printing like? What is its application? To somewhat clarify the above issues, we would like to introduce the most basic and general features of this printing method. Thereby, to provide readers with a better understanding of Tampon printing methods, allowing printing facilities to increase their ability to choose technology solutions for their suitable products. For establishments using Tampon printing technology, they have more understanding of the technology they are using, from there, they can expand to new products, and operators directly understand it in a basic, scientific way. about the technology and equipment we are using to master it and handle difficulties and errors in daily production activities.
1. What is Tampon printing?
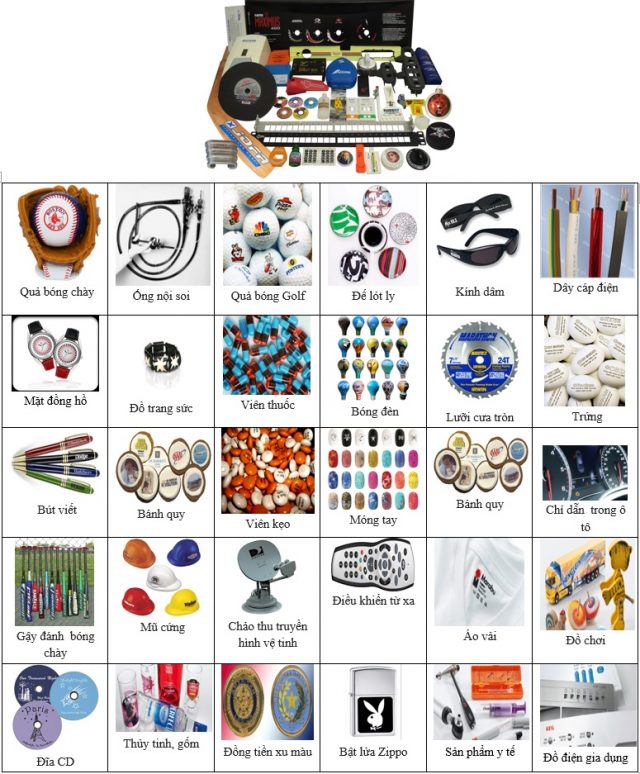
Around us there are many products made by Tampon printing, especially products we use every day that we don’t pay attention to, such as lighters, pens with logos, cell phones, logos, etc. icons on computers and computing devices, all the small markings inside cars, cameras and home appliances. Modern people are surrounded by the results of Tampon printing, but most people have not heard of it. Tampon printing is used more and more for industrial applications every year. Tampon printing began to conquer the printed products market in the early 1970s, especially in the printing area where other methods showed their limits or could not be used at all, that is, printing on surfaces surface is not flat. Tampon printing can be done on virtually any material.
Tampon printing (Tampography) (also called Pad printing) is a printing method that converts a two-dimensional (2D) image to a three-dimensional (3D) object. Tampon printing is an indirect image printing process. The image is deeply engraved onto a flat plate called a plate or stencil (cliché), which is then filled with ink. A smooth silicone pad called a printhead is used to pick up ink from the printing mold and then transfer it onto the printing material. Silicone material is used because it absorbs and releases ink well.

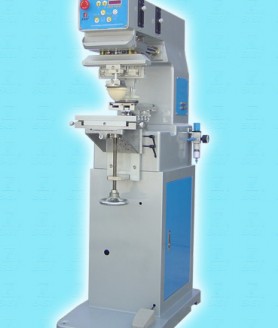
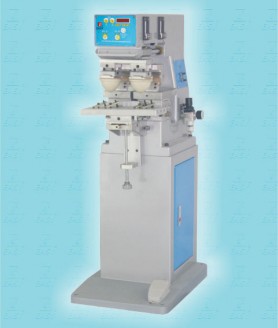
One-color and multi-color Tampon printer
The main and unique feature of Tampon printing is that it prints almost every shape of the printed material such as concave, convex, curved parts, printing on different surface structures, such as rough or uneven structures, printing into deep cavities… Using silicone as an ink medium has many advantages, it is a very versatile substance and can be molded into many shapes for any application. This flexibility allows the printheads (pads) to print on uneven surfaces. Printhead (Pad) selection depends on the shape of the product, image size and its location. Using height compensation, as shown in figure 2, will allow for only one simultaneous printing of an image at different heights.

Tampon printing can print on all sides of an object at the same time
The main advantage of Tampon printing is the ability to print on a variety of irregularly shaped surfaces, while other printing methods are often limited (flat or round surfaces). Nearly all known materials can be printed with Tampon printing such as; plastics, glass, metals, coatings, ceramics, auto components, pharmaceuticals, foods, cosmetics, wood and more.
Advantages compared to other printing methods:
Types of printing materials (substrates): Almost any material can be printed with the right inks;
Capable of high-quality printing: Resolution is much better than screen printing;
High ink durability: Depending on the type of ink used, very high durability (resistance) against mechanical or chemical abrasion can be achieved;
Easy handling and low maintenance: Easy to learn, operate and low maintenance costs;
Wet-on-wet multicolor printing: Ability to print multiple times without drying between prints;
Short print preparation time: Printing molds and inks can be changed within minutes;
Low initial/setup costs: Printing molds can be produced at the printing house;
Relatively small space requirements: Tampon printing machines and equipment are very small.
Low drying costs: In cases where simple drying by air at room temperature is sufficient;
Integration into complex systems, in-line production and assembly lines: For many years now there has been a successful combination of Tampon printing systems with inkjet equipment, in assembly lines.
Limitations of Tampon printing
Image size: Image size is limited by the printing plate, print head (pad) and the efficiency of the Tampon printer. The diameter of the largest effective printed image today is about 30 cm.
Ink film thickness: Tampon printing process uses printing molds with a depth of about 20-25μm (deepest 35μm). Typical inks will result in ink films of approximately 7μm. This layer thickness can be correspondingly increased by multi-layer printing. Coarse particles (e.g. glitter pigments) are difficult to print effectively.
Low printing speed: Low printing speed, even materials /substrates can be printed much faster with other printing processes.
Historical development of Tampon printing
The origins of Tampon printing can be traced back more than 200 years ago, when the first type of indirect printing, using soft gelatin material to print images. The first indirect printing of prints was made of bronze and engraved by hand. Currently, images are chemically engraved on steel and photopolymer or laser engraved. The use of a mechanical Tampon printer was made much later in Switzerland to print numbers on watch dials. Next a German company is known to have developed a Tampon printer and the first applications are to print more colors of dolls’ eyes. With the development of ink transfer silicone pads, Tampon printing has become a method of printing images on industrial products.
The Tampon printing process forms in the Decalcier (decal) process which is mainly used in the Swiss watch making industry. During this process, a gelatin print head (pad) is used to print the image onto the watch face. During the late 1960s, the implementation of a number of technological improvements such as the introduction of silicone printheads and more efficient machinery and the development of new applied applications provided opportunities. Perfect for the development of Tampon printing process.
The ability to print on surfaces has not been widely applied before, but now with the imagination of engineers and designers, Tampon printing results in strong growth in the mass production market. Nowadays, Tampon printing is a technology widely used in industries and applications.
2. Tampon printing products
Typical applications
Although Tampon printing is not known as a major printing process today, we see and encounter such printed products every day. For example:
– Microelectronic components, cables, connectors, microchips, relays, etc.;
– Industrial buttons and Keys on computers, phones and computer keyboards;
– Household appliances, household electrical appliances such as irons, VCRs, TVs, coffee cups, phones, etc.;
– Large industrial household products such as dishwashers, washing machines and dryers;
– Toys such as figurines, dolls, cars, baby bottles, pacifiers, etc.
– Special advertising such as pens, lighters, necklaces, watches, watch faces;
– Sports goods such as golf balls, baseballs, tennis rackets, soccer balls.
Tampon printing has its origins in Swiss watch making, it has expanded to many other industries, including: Electronics industry, semiconductor; Automobile components industry; Sporting goods industry; Medical components industry; Plastic components industry; Compact disc industry.

3. Tampon printing process (technology).
To print Tampons we need the following elements:
Tampon printer
Prints (clichés) or stencils with images deeply engraved on the surface
Tampon printing ink
The print head (pad) transfers ink
Fixed table (fixture) (to hold objects in printing position)
Object to print on (printing material)
Principle of Tampon printing
Tampon (pad) printing is an indirect printing process, it prints any type and shape of image receiving material. The principle is as follows:

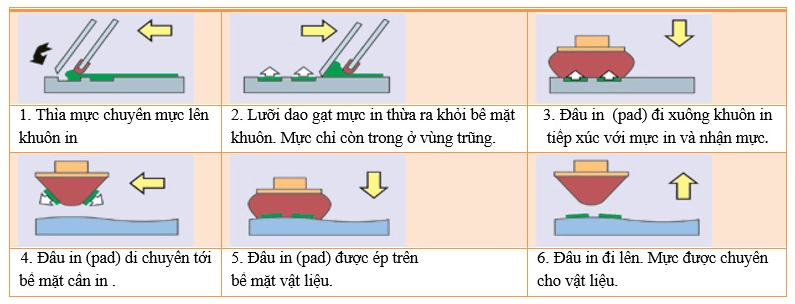
Nguyên lý chung của in Tampon
- Tampon printing process
Tampon printing is an indirect printing process like offset printing, the image is transferred through a silicone print head (pad) to the surface to be printed. There are two main ink removal methods in use today: the old open cup system and the newer, more widely used closed ceramic cup system.To do this, a plate containing the image to be printed is chemically engraved on the surface of a steel plate or on a polymer plate. Normally the corrosion depth is about 20-28 microns.
Using a “flood bar”, the engraved image is flooded with ink and then a doctor blade removes the ink from the flat print, leaving only a small amount of ink in the engraved area (deep part). ). The print head goes down, comes into contact with the ink on the plate to receive ink at the printing elements. Then, the silicone printing heads (pads) lift up, move to the printing material and press against the object to be printed to transfer ink to the printed surface. Finally, the print head returns to its original position, ready for another printing cycle.Quá trình in sử dụng cốc chứa mực đóng được thực hiện như sau:
1. Initial position: The ink cups are located on top of the printing plate (printing die) where the image is located (printing element).
2. The printing plate moves forward, revealing the engraved image, which is filled with wet ink. The solvent in the evaporated ink begins to form a sticky layer on the upper (contact) surface as soon as it is exposed to air.
3. The print heads (pads) go down and press on the engraved image on the printing mold. As the pad goes down, it compresses the die and comes into contact with the ink inside the engraved cell. When the print head (pad) is compressed, it pushes the air out, causing ink to escape from the engraving area.
4. When the pad print head goes up, most of the sticky ink film inside the engraving area is carried up and a small amount of ink remains inside the engraving area.
5. The ink solvents now begin to evaporate from the bottom of the ink on the image, creating a new sticky layer. The outer layer of the ink film is now at the optimal level of adhesion.
6. The print heads (pads) are brought down and pressed onto the surface of the object to be printed and ink from the print head is transferred part by part. When the print head is being compressed, the surface of the print head rolls outward. By this movement, the ink film is transferred to the printing material.
7. The print heads come up again, returning to their original position and ready for the next print cycle.
The printing process using an open ink cup is performed as follows:
1. Initial position: The ink cup is open and in the ready position. The surface of the mold includes deeply engraved images.
2. The bars (spoon) move forward to fill the printing plate with ink.
3. The ink on the printing mold is brought back to the ink cup by the scraper blade, and only remains at the deeply engraved printing elements. Evaporation of the solvents in the ink takes place on the contact surface, and the ink becomes sticky.
4. The printheads (pads) go down and press against the engraved image on the mold and come into contact with the ink at the printing elements. When the print head is compressed, it pushes the air out, causing the ink to separate and stick to the print head.
5. When the print head goes up, most of the ink film stuck inside the deep engraving element is carried away and a small amount of ink remains inside the etching cell.
6. The print head moves forward, then the print plate is passed ink again. The ink solvents now begin to evaporate from the bottom of the image ink layer, creating a new sticky layer. The outer ink membrane layer is now at the optimal level of adhesion.
7. The printhead is pressed down and the ink is separated from the printhead and transferred to other parts of the material. When the print head is being compressed, the surface of the print head is pushing (rolling/rolling) outward. By this movement, the ink film will now pass from the print head to the substrate.
8. The print head goes up again, back to its original position, in preparation for the next print cycle.
Print Head (Pad)
The print head is the most basic component of Tampon printing, it is what creates this printing method, and distinguishes it from other printing methods. Print heads (Pads) come in all shapes, sizes, colors and hardness. There are many factors involved when it comes to choosing the right printhead for the job. To choose the correct print head, it is necessary to base on the type of ink used, the surface characteristics and shape of the printed object, the image to be printed, the type of printer used, etc.
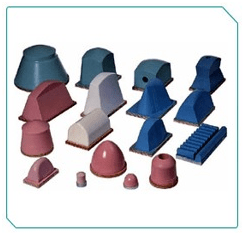

Một số loại đầu in (Pad)
- Fixed table
Fixturing (also called nesting, or fixture) is a place that holds an object tightly while printing. If the object cannot be held firmly in position, at the correct angle, and with the correct support, printing may not be successful.Prints/plates (cliché)
Printing plate or printing plate (cliché) is the object that carries the images to be printed. Printing plates come in many different types, they usually include steel and plastic plates. The choice of printing plates depends on many variables, however, the main consideration is based on the number of images that need to be printed from a given print. A photopolymer plate can give a maximum of 15,000 prints, while a ceramic plate can yield several million prints. Cost is often a secondary consideration in choosing a printing plate. If you need to print many different images or print low volume (less than 100,000 products), you can use laser engraved photopolymer plates with lower durability and more cost effectiveness. If you need to print the same image every day or produce large quantities (from 100,000 to several million), you may want to use ceramic or steel plates for the most cost-effectiveness.
Steel plates. For application areas that require precise and high-volume printing, steel plates are used. Steel plates can be produced by a number of methods. The first is the exposure method. This method involves taking a few steps:
– Coated with glue, the surface of the steel plate is covered with a layer of light-sensitive glue.
– Exposure. Before drying, a positive film containing the images to be printed is placed face down on the steel plate. When exposing the plate (Exposure), light will harden the light-sensitive adhesive layer on the non-printed elements (transparent areas on the positive film). Areas of printed elements (black areas on the film) that are not exposed to light are not cured.
– Appearance (water wash). When exposed for enough time, the steel plate is removed and washed with water, then the light-sensitive glue layer that is not affected by light will dissolve and separate from the steel surface, leaving only the cured glue layer on the non-printed element.
– Deep corrosion of printed elements. After being formed, the plate is placed in a tank containing a corrosive solution, consisting of nitric acid, iron(III) chloride, or other similar chemicals. The corrosion depth of a steel plate varies depending on its intended use. In general, the depth is approximately 16 microns for general requirements, and 22 microns for standard requirements.

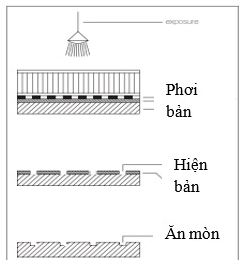
Quá trình chế bản in bằng thép
– The print heads (pads) are supported by peaks that allow ink to be received to maintain uniformity.
T’ram of steel plates (Screening Steel Plates). The T’ram points are located within the image area, which eliminates the problem of the ink blade sagging into the engraved image, causing uneven ink distribution. The small cone-shaped T’ram spot is located within the image area, providing the following advantages:
– The blade is supported by small peaks, it prevents the blade from sagging;
– T’ram dots keep ink evenly distributed throughout the entire image area;
To create T’ram points on image areas, one does the following. First exposure to positive film containing the image. Then, expose it a second time, remove the film containing the image, and use circular T’ram film. After drying twice, the plate is washed with water (rendered) and corroded like the other plates. This process of creating conical T’ram points shows that the plate must always be used when using plastic plates.
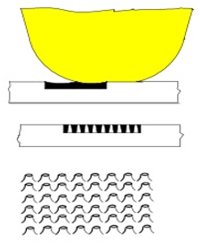
T’ram points – scattered throughout the imagery
Plastic Plates. For small batch production, plastic plates can be used. The plates, if handled properly, will be durable enough to produce thousands of prints. This plate can use a light-sensitive compound (photopolymer). When making plates, people expose (reveal) light with purple light shining through the positive film. At the spot where the element is not printed (transparent) on the film, the light passing through solidifies the photopolymer layer (making it insoluble when exposed). ). After exposure, the plate is washed/rendered with alcohol or water. The coating is a light-sensitive material that hardens when exposed to light and does not dissolve, the areas that are not exposed to light (printed elements) will dissolve and lie. deep below. By air drying the plates, and then exposing them to UV light, the durability of the plate plastic production is significantly increased. Today, people can use laser engraving to make prints, a simple, fast and high-quality technology.
4. Một số yếu tố ảnh hưởng tới quá trình in và chất lượng sản phẩm
- Silicone Print Head (Pad)
The quality of the image printed on the product depends on the surface texture of the print head (pad). When using a printhead for the first time, the silicone oil layer must be washed off the surface. This can be done using an ink solvent. The actual surface of the printhead (pad) that will be used for printing must also be cleaned, but only with recommended substances. It is important to understand that the pad surface should never be rubbed dry as it will harm the surface of the print head (pad) and its ability to transfer ink. The actual durability of a standard Tampon print head (under ideal conditions) ranges from 20,000 to 500,000 prints. Print head life depends on several factors: Types of ink used; Print head shape, size and hardness; Shape of printed objects; Types of printed material surfaces. The print quality of the print head breaks down (reduces quality) over time as the print surface (it needs to be smooth so the ink transfer is not deformed) comes into contact with inks and solvents causing the print head surface to become rough.
There are many suppliers of silicone printheads on the market that come in different shapes along with a range of hardness. Printheads are available in a variety of types with optional shape designs to suit specific applications. When choosing a silicone print head with many shapes and hardnesses, it will meet the printed product image at an acceptable level of different quality. However, it may not be easy to know in advance how a particular printhead will perform, so it is necessary to test many printheads for shape and stiffness to find one that is suitable for a particular application. Furthermore, the quality of the printing is often directly related to the quality of the silicone printheads. Its surface is very sensitive and can be damaged by volatile detergents, solvents or sharp edges on the printed surface. So we should treat and clean the printheads with its maintenance.
Clean the Silicone printhead. When using a new silicone print head, we must first “break” the outer protective layer. To do so, we should wipe the print head surface with a clean rag with acetone, alcohol, or ink solvent. This will remove the buildup of silicone oils applied to the surface of the new print head and will help break down the glossy layer seen on most new print heads. After the print head has been “broken” with 3-6 wipes (between each wipe it is necessary to print on paper about 10-20 times), we should use transparent and good quality tape. Some Tampon printers have automatic print head cleaning systems included as a standard feature. These machines minimize the time spent cleaning the print head during the printing process.
Clean the Silicone printhead. When using a new silicone print head, we must first “break” the outer protective layer. To do so, we should wipe the print head surface with a clean rag with acetone, alcohol, or ink solvent. This will remove the buildup of silicone oils applied to the surface of the new print head and will help break down the glossy layer seen on most new print heads. After the print head has been “broken” with 3-6 wipes (between each wipe it is necessary to print on paper about 10-20 times), we should use transparent and good quality tape. Some Tampon printers have automatic print head cleaning systems included as a standard feature. These machines minimize the time spent cleaning the print head during the printing process.
Type of printing plate/plate (cliché)
The plates used to print Tampons are usually made of steel or photopolymer materials. Steel molds have a very long lifespan, typically around 500,000 to 1,000,000 or more printing passes. While polymer plates have a much shorter lifespan, typically around 1,000 to 40,000 prints depending on various production factors. The appropriate print element depth for prints will vary. The most common corrosion depth ranges from 24-28 microns. The theoretical amount of ink located at the printing elements will vary depending on the type of print; engraving depth, shape and hardness of silicone print head. Theoretically, the ink layer thickness is 12-16 microns, depending on the depth of corrosion. Additionally, temperature, humidity, and other factors in the printing environment can affect the variability of the ink contained. The actual thickness of the ink layer transferred from the print head is about 4 microns. Ink thickness depends on the type of ink used, viscosity, print element depth of the plate, and atmospheric conditions such as temperature, air, and humidity.
5. Tampon printer
Tampon printers have several basic types: horizontal material printing, vertical or tilted material printing and circular printing. In all types of printers, closed or open ink systems can be used. To classify printers, one can base it on: the operating mechanism of the print head (vertical, horizontal or circular printing) or the operating mechanism of the ink supply system (open or closed type).
The printer operates manually
This type of printing is usually done on a very small scale. However, some may be useful for testing purposes. The first Tampon printers were operated by hand (Figure 9). Now, the only reason to buy them is the low initial cost. Except where Tampon printing is done on a small scale, the printing price is very low, however, maintaining more consistent quality is extremely difficult. This machine is useful for testing molds, print heads (pads), inks, and designs as an alternative to getting a test printer.

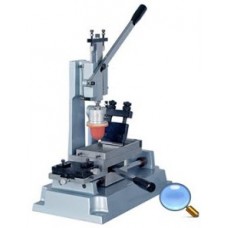
Máy in thủ công
Type of printer with open ink trough (Open ink trough)
In early semi-automatic machines, the ink mechanism was mounted above the die. Although there are many modern models that feature better, ink condition fluctuation control. This was the original semi-automatic system, dating back to the late 1960s and early 1970s. Early machines were mechanical, with little opportunity to adjust the individual functions of the printer because of the ink mechanism. and print head are mounted together on the same support. Printing speed is controlled by adjusting the speed of the main drive motor. Later, more complex control machinery gave more flexibility in adjustment.
This is a very robust system with a smooth printing process that is not affected by air pressure fluctuations. There are no complex issues with the printer, although controlling ink conditions is an issue due to the large surface area exposed to air. This can be improved in different ways. Some manufacturers help reduce evaporation by covering the ink and ink reservoir. Manufacturers make injection systems for ink and solvents – additives to compensate for evaporation. Changing ink and printing plates can be done relatively quickly by removing the entire ink tray, including the printing plate. One must consider the cost of replacing ink cartridges, which can be very expensive. The ink tray can be designed to catch ink spilling over the front of the plate, thus keeping the machine cleaner.
- Partially Covered Ink Troughs)
In this type of printer, ink is stored in a trough located behind the printing plate. The squid is pulled forward by a spatula/scraper placed on a horizontal frame with the squeegee blade inserted. While the ink is being poured onto the mold, carry a cover and it reduces solvent evaporation. When returned, the ink trough cover prevents further solvent evaporation.
The printer has a sealed ink tank system (Sealed Ink Cups)
This type of printer has a printing plate that moves back and forth, like a closed ink trough. Printers are designed to store ink in a bowl/cup that is turned upside down and pressed tightly against the printing plate, the ink is kept sealed. The cups hold the ink and also act as ink blades. The advantage of this system is that solvent evaporation is reduced to a minimum.
- In this type, instead of the print head (pad) moving back and forth from the printing plate to the printing material, the printing plate moves outward, while the print head remains in place. This type of machine has a print head with less vibration and faster printing speed. This type of machine can be used with either closed or open ink trays. Depending on the printer, the ink tank may be covered for the remaining part or for half the cycle during operation, helping to maintain solvent balance. Reciprocating cliches )

Rotary Presses (Rotary Presses)
Printers use a printhead (pad) which is a revolving silicone drum/tube, often combined with a steel mold tube on which the images are engraved. Ink flows into the printing plate (cliché) from a trough or tube, and a scraper blade removes excess ink. As the die tube rotates, the rolling silicone print head (pad) picks up the ink from the print element and transfers it to the surface of the print material. One advantage of this system is speed – small symbols can sometimes be printed at 120,000 sp/hr. Rotary head printing systems evolved directly from gravure printing. They are well suited for cylindrical objects and continuous flat printing.
Ink deposits tend to be slightly lower than with conventional Tampon printing, especially at high speeds. Additionally, the ink must be run with high levels of solvent; ink manufacturers recommend 20% – 30% solvent when printing in multiple colors. Each color may require a separate solvent mixture that must be determined at the start of a job and maintained throughout subsequent printing and runs. Controlling the solvent balance is essential. An ink pump should be used to maintain ink conditions. Normally the amount of solvent introduced must be set carefully so that the mixing ratios are correct. Some pumps have viscosity measuring devices.
Printer integrated with screen printing
This technique is used almost exclusively in ceramic decoration, combining Tampon printing and screen printing. When printing, the images are screen printed onto a special plate, and then the print head (pad) picks up the ink from these images and transfers it to the surface of the printing material. This type of printing was first used in the 1950s. This system does not use a recessed printing plate to carry the image. Instead, ceramic inks or colors are screen-printed onto a flat silicon-coated plate. The ink on this plate is stickier, and is then picked up by the print head and transferred to the surface to be printed.
Its advantages include:
– Patterns can be printed onto areas and surfaces (curved surfaces) that cannot be directly covered by screen printing;
– Smooth lines and curves can be printed at the same time, on one mold and one printer;
– Color intensity can be applied to complex shapes. This was previously only possible using screen printing, which could only print on a limited range of shapes;
– Screen printing, combined with Tampon printing, determines the number of colors applied. So the density is more than in regular Tampon printing. This ensures consistent high-quality prints. The design can accommodate a full range of applications, from solid lines to layered images;
– Users produce their own mesh at home, while engraving molds often have to be made by a supplier.
- Carousel printerThis colorful Tampon printing system uses a combination of two rotary tables and a print head that rotates on a conveyor belt. The materials are mounted on one table while the printing mold is mounted on another. Above the die is mounted a sealed ink cup, the die passes through the image areas. After picking up the ink from the images, the printheads and die tables rotate so that the printheads are positioned on the printing material. The printheads then transfer the image to the printing material.
This new machine is a multi-color Tampon printing system designed around a turntable. It uses a combination of two rotating turntable carousels. The substrates are mounted on a table, while the printing die can be adjusted in X, Y, and rotation axis, allowing precise positioning of the image.
The Machine Prints on non-horizontal surfaces
This type of machine is very suitable for printing on vertical or inclined surfaces. All the standard inking mechanisms are used with these machines, but in general, they tend to use smaller printing plates. This device is often used in conjunction with vertical machines for printing on the side of the object while conventional machines print on the top side. Printing angle can be changed up to 90°; Some machines will even print facing up.Computer Numerical Control (CNC) printer
In computer numerical control (CNC) printing, the substrate (printing material) is fixed and the print heads are programmed to print one image at a time onto the items. A CNC controlled and operated system can be built into standard machines or modular assemblies to suit virtually any application. With all the different forms of printers up to this point, the printing stations were fixed and parts were supplied from one station to the next to achieve a multi-color print. However, this is not the case with printers that use computer numerical control (CNC). Here, the material is stationary and the printheads are programmed to print one image at a time onto the sections, as shown in the figure.CNC controlled and operated systems can be built into standard machines or modular assemblies that can be manufactured to suit virtually any application. The level of complexity is governed only by the imagination of the designers and the number of modules it wants to use. All elements of component manipulation can be combined with multiple closing ink cups, cleaning the print head, changing the print head length, replacing the print head shape, etc. This system is often used when items must be printed in accordance with other assembly processes, or for complex printing on different surfaces.
Some operating principles of Tampon printers
Tampon printers are developed by a number of different applications. Most machines are operated by an electronically controlled pneumatic system, so they are called electro-pneumatic equipment. Some machines are controlled pneumatically rather than electronically. There are also electrohydraulic machines that are typically only used for large format applications where additional compression is necessary. Manually operated machines are useful for small format and short run applications. Images are typically limited to less than 40 cm2, and multi-color printing is limited. Many label printer manufacturers offer regular commercial, improved, and upgraded semi-automatic and automatic equipment to meet high customer requirements.6. Tampon printing ink
In principle, Tampon printing ink is quite similar to screen printing ink. In many cases, there are still screen printing inks sold and used as Tampon printing inks. Printing inks, specially developed for the Tampon printing process are required to obtain optimal results. In Tampon printing, two types of ink are used, solvent-based ink or UV ink. Water-based inks are not used in the Tampon printing process, and screen printing inks or solvent-based paints will not provide sufficient assurance. There are many different types of Tampon inks.
Stickiness of ink. The most important issue related to Tampon printing ink is the adhesion of the ink to the printing material. Depending on the type of substrate used, additional ink component agents may be necessary to ensure proper adhesion. Choosing the right ink lines for a specific application depends on the needs of the application. For example, the type of printing ink depends on whether or not a glossy or matte film is required, whether or not dilution or other chemicals will be used during production, and ink adhesion testing must be be done.
Dilute the ink in Tampon printing. Tampon printing ink is usually diluted about 10% to 20% with diluting oil. The best printing viscosity depends on various factors such as the hardness of the print head (pad), the size of the image and the nature/characteristics (porous or non-porous) of the substrate.
Viscosity. Ink viscosity is a very important factor in the printing process, each printing method often requires a suitable ink viscosity. While printing, you must ensure that the ink has the correct viscosity as prescribed, and must remain stable throughout the printing process of a product. When mixing additives into ink, pay attention to the viscosity of the ink. The following steps must be observed to ensure proper viscosity:
– Ink drying agent, when added to two-component ink, must be mixed before checking ink viscosity;
– Thinners and thickeners used to adjust ink viscosity must be added drop by drop to the ink. The squid must also be stirred continuously;
– If this is not done correctly, pigment damage will occur. This means that the pigment ink is separated from the resin base and no ink can be used.
Ink ingredients
The composition of Tampon printing ink is basically the same as general printing inks, including pigments, binding agents (loading, distribution), drying agents, diluents and other additives.Basic components of solvent-based ink: Resin (Resin) – 20%; Pigment – 17%; Solvents – 60% ; Additives – 3%. All inks used in Tampon printing have been specially developed and dry in a short time during each printing cycle. The carriers and binders in the inks are synthetic resins or an epoxy or polyester base compound with pigments mixed into the mixture. Tampon printing ink, above all, must have very good release (release) characteristics from the silicone print head. It is also extremely important, that is, the ink film on the print head becomes sticky during the transfer process, by solvent evaporation.
Such an adhesion is necessary, since the tendency to stick to the printing material must be stronger than the adhesion of the ink to the silicone print head. Therefore, it is very important to choose the appropriate ink solvent for the specific needs. If the solvent evaporates too quickly, the ink will dry in the reservoir and the separate ink separation of the silicone print head will be inadequate. On the contrary, if the solvent used dries too slowly and is not good enough to stick to the plates and on the silicone print head, the transfer will be very poor and inconsistent (the first prints may look acceptable and the the next print will be missing the ink of the printing element). Therefore, this requires adjusting the drying characteristics of the dried ink. Additionally, by blowing cold or hot air on the print head surface, the evaporation of the solvent is accelerated and transfer can be improved along with faster production rates.
Ink viscosity must be determined individually by adding appropriate diluent oil in a quantity according to the nature of the image to be printed and the surface of the printing medium. It is very important that the correct ink viscosity is maintained throughout the printing process by adding diluent oil throughout the printing period. In many manufacturing environments, especially on open ink storage systems, diluent oil is typically added approximately every 45-60 minutes, since the solvents are continuously evaporating from the ink mixture. However, if the ink is diluted too much there will be problems with the printing material; through the ink surface, a film may appear, because the opacity of the ink is reduced by adding too much more diluted oil. If the ink viscosity is too high (i.e. the dilution is not enough) static problems (ink standing still) can also occur.
Ink systems and their applicability
One-ingredient ink. These inks only include ink film-forming ingredients and dry by solvent evaporation (physical drying). Generally, a component ink is used for printing on thermoplastic printing substrates/materials, such as Polystyrene (ABS and SAN), Polycarbonate, soft and rigid PVC, Polyethylene and polypropylene. If the required durability is not too high, these inks are ideal for printing common products such as lighters or pens. Single-component inks usually last well in the reservoir, printing Tampons with these inks is quite easy compared to two-component ink systems, and from there, single-component inks can be used for a while long time.Two-component ink. These inks consist of two separate parts: film-forming ingredients and drying ingredients, which dry mainly by chemical reaction (chemical drying). The two-component ink is mixed with a drying/hardening agent before printing. The hardening/drying agents react chemically with the ink leading to cross-linking creating an ink film. These inks are the best choice for high durability requirements or difficult-to-print materials. The disadvantage is the so-called “life of ink in the bottle/cup”. As the reaction of the ink with the hardener/dryer is initiated by mixing the two components, the processing time is limited, mainly around 8 hours. If very high mechanical and chemical resistance of the ink is required, it is recommended to use two-component inks. These 2-component inks are suitable for printing thermosetting plastics (melamine, polyester, etc.) as well as thermoplastics e.g. Polyethylene and polypropylene and a variety of metal, glass and ceramic substrates.
Two-component inks dry by solvent evaporation and chemical reaction (polymerization) between the ink and the drying/curing agent. Note that the ultimate strength and resistance of two-component inks is achieved after full curing has taken place, a curing time of approximately 24-72 hours. One problem in working with two-component inks is the shorter shelf life (life) in the reservoir (cell), which is limited by ink and type of drying/hardening agent to 6 to 8 hours, the The shelf life of the mixture is predictable. Two-component inks are widely used in industrial Tampon printing applications.
One- or two-component synthetic inks. Combination inks dry quickly like 1-component inks with the excellent durability of 2-component inks, however they do not have as high a “life in cup”. Depending on requirements, these systems can be dried with or without a hardener/dryer. They include popular inks for adhesion on different substrates. This ink system is ideal for printers that frequently change media or have to refill
Respond to change requests.
UV ink. In addition to the standards of one-component inks, they are similar to one-component inks but are cured/cured by UV light. These inks are dried by ultraviolet radiation, a process that changes the ink molecular structure by forming larger molecules. UV inks have many advantages over other inks such as reduced drying time, reduced solvent emissions into the environment, and constant viscosity. However, because these inks use ultraviolet radiation, increasing curing time, special precautions must be followed when using these inks. For example, radiation sources must be enclosed and direct contact with process sources must be avoided. Additionally, because such precautions are necessary, and because of environmental concerns (Ozone is generated during the drying process, so dryers must be placed in a well-ventilated area), the process is expensive. than. The disadvantages, are the need for a rather expensive UV dryer and the limited applications in terms of individual ink ranges. As such, UV inks will not be effective for printers of promotional items and variable jobs, while they are used successfully for industrial applications.
The type of ink to use regularly depends on the requirement. 1-component solvent-based inks are most effective, however, integral 2-component systems are often used. On the other hand, UV ink can be a very effective solution for some printing jobs.
Coverage and safety of Tampon ink
Compared to screen printing, in theory the ink transferred to the product in Tampon printing is much less and the composition (structure) for screen printing applications is not suitable for Tampon printing because they lack the coverage (opacity) of the ink. . In fact, Tampon printing ink will have nearly 4 times more pigment than screen printing ink. The color selection is completely equivalent to screen printing inks and almost any color can be produced. Many Tampon printed items, such as specialty promotional items and children’s toys are regulated by law in North America and Europe to accurately describe the needs of the ink found on the products. . Most especially the legal provisions for the printing of toys and similar items must be clearly understood. This law prohibits the use of coatings/inks containing more than trace amounts of heavy metals. Some ink colors must be modified from their standard pigments to meet strict requirements.Choose inks when printing on printing materials
Wood, cardboard, paper. 1-component ink is mainly used for these types of materials. Different coatings show very different printability, it can be difficult to print on glossy wood materials.Insulation plastics (e.g. PVC, PMMA, PS, ABS, PC, etc.). In addition to mainly using 1-component ink. For higher durability 2-component ink will be advantageous.
Polyolefines (PE, PP). Due to low surface tension the materials must be pre-treated (corona, fire treatment). There is a special system for PP raw materials that can be applied to non-processed materials.
Duroplastics (PA “nylon”, PU, phenolic plastics, etc.). For printing these materials, two-component inks are mostly used. This is mainly due to the high requirements of printed products (e.g. the automotive industry) having to be met.
Metal. The printability of metals is so variable that many different ink systems are used. It is extremely important that materials are cleaned of surface contaminants (e.g. oil films) before printing.
Glasses. Special 2-component inks are used to print on glass. These systems are often also suitable for precious metals. However in relation to wash fastness one must consider that it may not only destroy the glass surface but may also damage the print heads (pads).
7. Printing materials/substrates (Substrates)
Tampon printing is as versatile as screen printing, almost all materials can be printed with both printing processes. Plastic, Glass, Ceramics, and metals such as steel and aluminum, paper and lacquered surfaces, to name a few. However, some materials require surface treatment before printing.
Pre-treatment of Certain Substrates
Polyolefin materials (LDPE, HDPE and PP) cannot be printed without pretreatment before printing. The recommended surface tension is 38 dyne/cm. This surface tension value is necessary to ensure good adhesion of the ink to the substrate. Use a testing device to test surface tension on very critical materials. If the value is lower than 38 dyne/cm, the test ink used will form bubbles (not wet) on the surface of the material. Surface tension of some commonly printed materials (dyne/cm): Polytetrafluorethylene (Teflon) – (19-20); Silicone- 24; Polypropylene – (29-31); Polyethylene – (30-31); Polymethy- methacrylate – 36; Polyamide – (26-46); Polystyrene – 38; Polyester – (41-44). To provide a sufficient adhesion on such material, the area to be printed must be pretreated by a flame (Flame) or an electric charge (Corona). This method is polyp primingropylene and is applied over the entire print surface of the substrate manually before being printed using a wipe or spray system. After drying, polypropylene substrates can be printed, using 1- or 2-component inks. Electrostatic pretreatment is based on a high-voltage electric beam with voltages from 5 – 15 KV at different frequencies of 15 – 30 KHz. Bonding Agents can also be used. This method uses a chemical adhesive. The process requires that the components of the surface be coated with special substances. The use of binding agents as a pretreatment is limited to small print series. This process requires good ventilation of the production site.
Post Processing
Another very important factor in ink adhesion is Polyacetal or Delrin. Adhesion on these materials can be obtained by a cure (after printing) with a hot air dryer by blowing a stream of hot air about 350°C for 2-3 seconds, immediately immediately after printing. In practice, it has been found that the best method is to use post-printing heat treatment with such substances. The main purpose of processing materials after the printing process is to reduce the curing time required for the components. Post-treatment, or curing, is typically used in applications where components will be subjected to further processing within a relatively short period of time. Methods of drying images include flame treatment, hot air, or passing through an infrared dryer. It is important to be careful with two-component inks, even if they undergo a post-processing process.8. The development of Tampon printing
Tampon printing has come a long way since its birth in the pre-industrial revolution. Gone are the hand-engraved molds, the pigments pounded with a pestle mixed with glue, and the gelatin pads used by watchmakers of yesteryear to print on dials. Today, pneumatically assisted Tampon printers can process 3000 or more images an hour precisely on the conveyor unit, can automatically check exact tolerances with a computer vision system and then retrieved by robot arm at high speed.
With global economic demands, industrial manufacturers have seen Tampon printing technology evolve to integrate efficiency, productivity, and environmental improvements. Pneumatically assisted and electric motor-powered printers have replaced hand-operated printers; High-speed mounting system for mounting and dismounting at locations; and closed ink cups are used instead of open ones. From the cleanroom of a medical product manufacturer to the automotive assembly production line, Tampon printing has the adaptability to customize for entire regions of label industry products and consumer needs demand decorative products.
Printing industry Tampon printing in the future. Today’s industrial advances, combined with global economic and environmental concerns, pose challenges to industrial production. As efficiency and automation become the trends of a new generation, the ability of Tampon printing technology to adapt to changing needs will serve to keep it at the forefront of decorative tools. Since then, technological breakthroughs have developed in the industrial process, when applied to printing Tampons, enriching a decorative technique on all types of products.
Internet-compatible PC-based programming Tampon printer. The new generation of industrial Tampon printing, printers are equipped with an Internet connection, allowing troubleshooting, program downloads, and testing to be performed from any location on the planet with a phone or access satellite, which creates convenience and savings for customers and printers in the production process.
Laser engraving. Advances in YAG and C02 laser technology are being applied to mold making, speeding up the process and allowing for greater precision. These setups often come with computers and their own graphics software that allows decorators to import images, manipulate them, and engrave prints in a fraction of the time required with the process from the machine. calculated up to (CTP). Benefits in industrial environments include a short turnaround time from artwork to Tampon printer, allowing for more economical conversion of images and faster payback in small-volume printing, leading to profitability higher on print jobs. Additionally, an area of technological development is UV inks for Tampon printing. UV inks are being used by medical product manufacturers.
Conclude
Tampon printing is a process that is both simple and sophisticated. The variety of Tampon printing capabilities may imply that the system is difficult, however, the entire system, including machine, plate, print head, ink and substrate has to be used to achieve the results. perfect result. It is the variety and uniqueness of Tampon printing that makes this process indispensable. This applies not only to the decoration of promotional products but also to the design or toys as well as technical marks.
Tampon printing is very versatile and flexible. Many objects can be printed, the printing technology is simple and easy to operate, the time is short

 Tiếng Việt
 한국어
한국어 中文 (中国)
